dinsdag 8 oktober 2013

X-wing Hangar

Usually things go wrong when you and your friends get excited over the same things. This time I purchased the x-wing game of fantasy flight games. All was well until my friend Sander started liking the game (almost 20 seconds after the original purchase), then it went bad. He purchased a ton of stuff and for gaming's sake I couldn't stay behind.
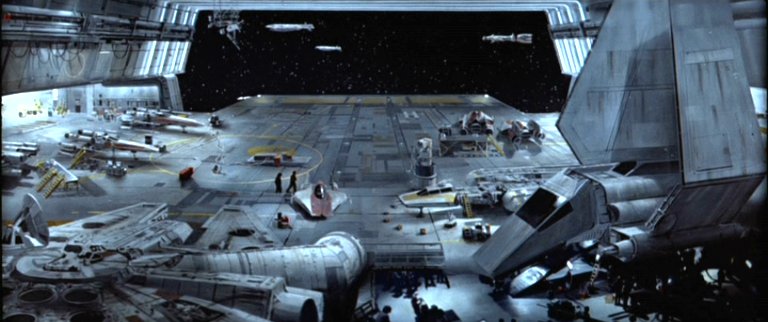
Sitting back after a game Sander came up with the idea to make a transport case for the models. A few sleepless nights and the design was there, based on this picture:

I included a drawer below the hangar floor to carry all the movement dials and flight stands. As soon as I get my hands on some transparent blue acrylic sheet, the forcefield will also be in place.

Below you'll find some pictures of the build. Sander did the paintjob (phew!) in return for an empire hangar, which will be next as soon as I get inspired.


zondag 8 september 2013

Art fair "Leeuwer Cantorij"

Today I participated in an art fair (my first) in my place of birth. I think it's very special that of 32 participants there were, besides me, 3 of my childhood friends showing their art.
This morning it was rainy so I brought a lot of assembly work in case no one showed up. Glad to say I only got to assemble 1 piece; the crowd was huge thanks to the lovely weather. The pieces below were sold before they were assembled, which is very nice but also a bit sad as I can't enjoy them myself for very long. A big thanks to the volunteers who organised this fair and to those who showed interest in my work!

Please take a look at my friends work at www.frankstoks.nl

Bye! Mark.

zaterdag 10 augustus 2013

Recycled coffee tables

My wife picked up these two coffee tables somewhere at a flea market in 1994,
paying $ 1.
Back then, we painted these 70's style dark-stained oak tables black to match our student interior. While tyding up our house this week we came across these battlescarred tables which have become obsolete.
Before returning to work next week I really needed to do a (small) project to end my vacation in style. To the workshop!


First I stripped the paint and sanded them, keeping some light woodstain to accentuate the grain. My son helped stripping the paint and earned a whopping €0,20.

The tabletop was so worn down it had to go, opening up a great opportunity to make one from scratch.


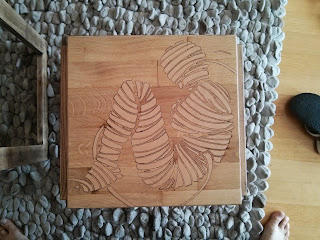
I started out with some 6mm oak parquet which has been lying around the house for years. I glued 2 tabletops and clamped them between two boards to keep them level.


Next, I cut 2 different mummy designs with my laser cutter. (why a mummy? you can find it in a previous post)
Originally, the mummies sat in an uncomfortable position on their knees, stressing their agony I guess. For these tables, I rotated them to make it look like they were sitting, which I think is nicer for a friendly coffee table.

I glued a sheet of MDF to the back of the oak to give it some support.


Cut to size and sanded flat the tabletop revealed exactly the intended image, which is also nice for once.

The contrast between the grained oak and the plain MDF which I used for the inlay creates a nice effect; not much color variation but only structure.


To make sure the MDF would withstand future abuse I spray painted the tabletop 8 times.

I am very pleased with the end result, now I have to go and find a place to put them.

Bye! Mark.


woensdag 26 december 2012

Tin Tin Rocket

Looking for some nice models to test my laser, I came across this tintin space rocket on thingiverse. My wife thought it would make some nice bookshelves. That said, it stood in my living room for half a year to let the plan mature. When last summer my dad and me merged our workshops I realized that I needed a project to get to know all the new woodworking machines. Enter the rocket-shelf.

Apart from the usual joy of making something, I had a great time with my dad being around almost every day, showing me the ropes on his machines.
I ended up using a cutter and a template to get the plywood in its curved shape. All connections are dowelled joints.
As a finishing touch, I engraved fragments of the original (french) comic on the shelves, making it a tribute to Hergé.

Bye!
Mark.


zaterdag 15 december 2012

Tales of mystery and imagination

Geboren in 1971 begon mijn muzieksmaak zich te ontwikkelen in de 80's. Enkele hoogtepunten en dieptepunten uit die periode spoken nog regelmatig door mijn hoofd. Mijn zus was fan van 'Abba', en als je maar vaak genoeg een nummer hoort begin je het ook leuk te vinden, zo getuige mijn vreemde huidige nostalgische voorliefde voor deze zweedse popgroep. Ik had het geluk dat ik door mijn buurmeisje geïntroduceerd werd in goede muziek. Zij was fan van 'the Police' en had ook een verzamel-LP (als je nog weet wat dat is) van 'The Alan Parsons Project'.


Dit was meteen raak; niet alleen de composities van Eric Woolfson maar ook de thematische benadering van de albums en de manier waarop Parsons muzikanten bij elkaar zocht die zouden passen in dit specifiek project sprak mij zeer aan.
Er volgde een lange zoektocht naar alle muziek van Parsons en Woolfson, alsmede de muziek van de muzikanten die bijdroegen op de albums. Dit was in de tijd dat er nog geen online muziekbibliotheken waren, je moest naar winkels en phonotheken (een soort bibliotheek waar je muziek kon lenen) om muziek te vinden. Een van de laatst gevonden LP's was hun pilot-project: Tales of mystery and imagination, gebaseerd op de verhalen van Edgar Allen Poe. Uiteraard heeft dit weer geleid tot het lezen van deze verhalen, wat mijn verbinding met de muziek alleen maar sterker heeft gemaakt.


In de jaren 90 heeft mijn vriend Frank Stoks wat t-shirts voor me gemaakt met de afbeelding van de album-cover van 'Tales', zie rechts. De afbeeling van de mummy heeft me altijd gefascineerd, en met een lasersnijder in de garage roept dat om een project (pun intended), waarvan hieronder het resultaat te zien is.

Als er iemand weet te wie de artiest is die de originele albumcover heeft gemaakt zou ik dat graag te horen krijgen, hij staat niet vermeld bij de credits.


Ik wilde de achtergrond de sfeer laten bepalen, na wat experimenten met verschillende kleuren vond ik een oud moederbord. Het project heeft zo een extra lading gekregen, zoiets als 'geïsoleerd in het digitale tijdperk'. Laat a.u.b. een reactie achter met je mening.


Bye,
Mark.

dinsdag 11 december 2012

Preview


Even een korte preview van wat er gaat komen, gewoon omdat het me al een week lang niet los laat.
Binnenkort meer!

Bye!
Mark.


zondag 9 december 2012

Kinetische Kandelaar

When I bought my lasercutter last year I immediately executed some tests, among which several tests to determine how thin I could cut wood without burning it. One of the test-produced objects is this eiffel-inspired ball (right). The overal appearance of the thin beams, fortified by the double circles makes it an attractive piece.
When browsing Benjamin Cowden's site I thought of this ball and his geared candleholder was screaming for a makeover.

Toen ik vorig jaar mijn lasersnijder heb gekocht heb ik meteen wat testen uitgevoerd, bijvoorbeeld hoe dun je hout kunt snijden zonder het te verbranden. Een van de testproducten is deze eiffel-geïnspireerde bal (rechts). De uitstraling van de dunne balken, versterkt door cirkels maakt dit een aantrekkelijk voorwerp.
Toen ik de site van Benjamin Cowden bekeek moest ik hier meteen aan denken. Zijn idee van een kinetische kandelaar schreeuwde om een makeover met mijn laser.


First thing I did was to create a template for the beams in Solid Edge, so that I would just have to enter its length and wall thickness to create a new one.

Allereerst heb ik in Solid Edge een variabele balk (links) ontworpen, zodat ik alleen de lengte hoefde in te geven om een nieuw object te creëren. De rest van de balk wordt dan uitgerekend op basis van de (van te voren in te stellen) wanddikte en maximum breedte. 


To create the illusion of iron I-beams I cut the outline of all beams and glued it to both sides of the beam. In the picture to the right you can see that only the middle part is the structural part.

Om de illusie van ijzeren I-profielen te bewerkstelligen heb ik van alle balken ook alleen de 'outline' gesneden. Eén balk bestaat dan uit 3 lagen MDF, waarvan de middelste laag de cirkels bevat (rechts).


To create the gears I used a document found at bostongear containing all ins and outs about cogs. It found it very interesting and will use it someday in class. I painted and drybrushed (knowing this technique thanks to my wargaming hobby) to get the metal-look. The bolts are still to shiny so I will have to paint them someday.

Om de tandwielen te kunnen maken heb ik een document van bostongear kunnen vinden met alle ins en outs van tandwielen. Interessant studiemateriaal! Hier moet ik eens iets mee op school. Het uiteindelijke bouwwerk heb ik ge-drybrushed (met dank aan mijn wargaming-hobby) zodat het er metaal-achtig uitziet. De glimmende bouten en moeren verdienen nog een laagje verf.


Bye!
Mark.